Saturday, November 22, 2014

Petite Pumpkin Pies with Spiced Whipped Cream | Thanksgiving Tablescapes


With Thanksgiving just around the corner, I have been experimenting with desserts and decorating the table.  That last week has been busy!
I decided to put a spin on the most traditional Thanksgiving dessert, the pumpkin pie.  I did not change the ingredients of how I make the pie, I just changed the serving size and the topping.  My petite pumpkin pies are adorable and tasty, as well as the perfect serving size after a large Thanksgiving dinner. 


These little pies hardly took any time to prepare, bake and eat!  I think they were easier because I did not have to “blind bake” the pie shell, like I would if I was making the traditional pumpkin pie.  In the spirit of my grandmother, I made my own whipped cream, but added some special spices for more added flavor.  The spiced whipped cream was nutty and spicy, the perfect flavor combination with the creamy pumpkin pie. 


Petite Pumpkin Pie with Spiced Whipped Cream

1 can (15oz) of Pumpkin Pie

1 can (14 oz) of Sweetened Condensed Milk

2 eggs (room temperature)

1 tablespoon of Pumpkin Pie Spice

-----------------------------------

¾ cup of chilled heavy cream

2 tablespoons sugar

¼ teaspoon of ginger

½ teaspoon cinnamon

For this recipe, I used premade, store bought pie crusts (2 rolls).  Make sure that you let them sit out until they reach room temperature.  If you don’t, they will crack when you unroll them.  If you choose to use homemade crust, that would work well too.  I actually have a wonderful crust recipe that I will be sharing soon.
Preheat the oven to 425 degrees.  Spray the muffin tin with cooking spray.  Once the dough is at room temperature, cut out 4 inch circles.  I used a bowl, but feel free to use whatever instrument you have that will give you a 4 inch circle.   Place the dough into the muffin tin.


Mix together pie ingredients, making sure well incorporated.  Spoon mixture into the dough cups.  Bake in over for 15 minutes.  Reduce the oven temperature to 350 degrees and bake for another 20-25 minutes, or until a toothpick inserted in the center of the petite pies comes out clean. 


Allow the petite pies to cool in the muffin tin for about 30 minutes, the take out the pies and place on a wire rack to continue cooling.  Once cooled, serve immediately or chill.


While the pies are baking, make the spiced whipped cream.  I like to make sure the mixing bowl is chilled, so I will place cold water and ice inside and place it in the fridge for 10-15 minutes.  I make sure it is dry before I begin making the whipped cream.  Any additional moisture will make the whipped cream runny. 

Beat the heavy cream, sugar and spices together in the bowl until soft peaks form.  Put in a glass bowl for storage in the fridge, or serve immediately on top of petite pies.
These petite pies are a lovely addition to any dessert table during the holidays.  They are also great wrapped up for leftovers if some of your guests have other places to visit on Thanksgiving.  It is always nice to give your guests some treats to enjoy later on...a little midnight snack of pumpkin pie is always fun! 

Here you can see some of my packaging techniques that I use to make the "doggie bags" more personal and festive.  I like to create tags for the different holidays or gifts I give to family and friends.  Here are my special Thanksgiving tags, which can also double as place setting cards.


I have been playing with two different tablescapes for Thanksgiving day.  I love both for different reasons and I am having a hard time deciding on which one to pick for Turkey day.  For the first display I used one of my favorite decorating items, the wooden box.  My dad made this for me and I have used it numerous times.  Most recently this spring will a display of daffodils.

I love being able to reuse items in different ways, as I have done with the box and also the burlap runner (which also was on the table for spring.)  The natural color of the wood box and the burlap runner really highlight the browns of the Thanksgiving.  I love how the pumpkins and gourds pop against the brown of the table, napkins and chair covers.  The creaminess of the candles (from Williams-Sonoma, a million years ago!) and my new natural candle holders (purchased from Hobby Lobby in the paintable wood section) really add an element of elegance. 
My second table highlights that bounty that is Thanksgiving.  The pewter bowl is an heirloom from my grandmother.  I love it and it has such versatility.  In the bowl I stacked guards, pumpkins and apples, which are all fall foods that are incorporated in Thanksgiving day food.  Again, I am using my burlap table runner (made by my mom for a bridal shower!) but dress it up with some additional pumpkins and some bundles of wheat (purchased a couple years ago from curiouscountrycreations.com.  Martha Stewart is also a patron!)  I love how the centerpiece is rich in a variety of natural fall colors, without being too over the top.  The wheat adds a sense of simplicity while the bowl adds a touch of sophistication.  I love the balance between the two concepts.
In the photos you can also see the seating cards, which I made.  They are very simple and with a little graphic and saying.  I think they add a touch of whimsy, while also giving a very important direction-where to sit to eat!  It is nice to know where you are sitting, as it prevents confusion for guests and people will not roam about the table looking for a place to sit.  Seating cards are another good way to strategically place people to help foster conversation, especially if you have guest who may not know everyone or if you have guests that like to talk about certain topics, such as sports, politics, etc.  You can group the people together who like talking about the same things.


The napkin ring holders were another Hobby Lobby find, in the same section as the candle holders.  I thought they were so pretty and would look fabulous on the Thanksgiving table.  When I purchased them, I knew I would be using the deep brown linen napkins.  The natural wood napkin rings are elegant and minimal, adding style to the table.

I hope in the next few days to share a few Thanksgiving recipes.  I have been thinking and rethinking the menu and have been making endless grocery shopping lists for the past couple of days now.  I am excited for next week’s meal.  Thanksgiving is a wonderful time!


Sunday, October 26, 2014

Molasses Crinkles

The smell of these cookies baking in the oven smells like Christmas.  Yet, I love making them in the fall because of their color and the ingredients.  They are a simple and easy cookie to make.  The worst part is waiting for them to bake! 


Molasses Crinkles
¾ cup of unsalted butter
1 cup packed brown sugar
½ cup molasses
1 egg
2 ¼ cup sifted flour
2 teaspoons baking soda
1 teaspoon cinnamon
1 teaspoon ginger
½ teaspoon cloves
½ teaspoon salt


Preheat oven to 350 degrees.  Mix first four ingredients together.  Add flour, baking soda, cinnamon, ginger, cloves and salt until well blended using paddle attachment.  Cover bowl with plastic wrap and chill dough for 2 hours.  Roll dough into balls and dip tops into white sugar.  Bake at 350 degrees on a parchment lined baking sheet for 8 minutes. 

The dough mixing in the new KitchenAid Mixer.  Make sure to use the paddle attachment.  It is a lovely brown color.

The dough ball rolled and dipped in sugar.  Place them on a parchment lined baking sheet.  This photo was taken right after the cookie were placed in the oven.  Sorry for the shadows!

Cookies and cider, the perfect combination.  The cider is homemade, right with our own apple press.  Delicious!

Thursday, October 23, 2014

Holiday Entertaining | Cheese Board

I do not mean to push Halloween away, but it is never too early to start thinking about the holidays!  Over the summer I created a cheese board that I served during cocktails when we had people staying with us.  It was very simple and everyone enjoyed sampling different cheeses and crackers.  It was very "summery" with strawberries and other summer fruits, as well as some nuts and meats.

I decided that I wanted to revamp the cheese board and have it be more "harvest" friendly for Thanksgiving.  I will probably change it around a bit for Christmas, too.

A cheese board is very simple and it can be as big or small as you would like.  I like to serve it on my wood cutting board.  It provides a stable surface and also a place where cheese can be cut without damaging anything.  Guest will be blown away with the beauty of this entertainment piece and think it was time consuming to prepare.  In reality, it will only take you about 10 minutes. 


Fall Harvest Cheese Board
3-4 different cheeses, whatever flavor you prefer 
2 kinds of dried fruit-cranberries, apricots 
2 kinds of fresh fruit-grapes, apples, or pears (cut up apples and pears) 
2 types of meats-salami and prosciutto 
2 types of hearty crackers 
Fresh nuts-any kind, I prefer pistachios

I like to also serve this cheeseboard with a small bowl, to collect any shells from the nuts.  Make sure that you have cheese knives so guest can serve themselves cheese.  Making sure there is a variety is key to a successful cheese board. 

There is no right or wrong way to arrange the food on the board.  It all comes together beautifully.


This would be a great addition to the Thanksgiving table.  If you are having a late dinner, this would be a great way to entertain your guests while the turkey is cooking.  It could also be added to the buffet and served during the holiday meal.  The options are endless.  One thing I do know is that your guests will the beauty and deliciousness of the cheeseboard and you will love its simplicity.


Wednesday, October 22, 2014

Halloween Sugar Cookies

I truly enjoy making sugar cookies for each holiday.  The recipe I follow yields delicious, soft and golden cookies.  The dough is very easy to prepare and freezes well, too.  In the spirit of Halloween, I decided to make some cookies.  I had them ready for dessert after dinner, with some left over for the kid's lunches and some to package to share with our very special neighbors. 

Another reason I was excited to make cookies was because I was able to use my new KitchenAid mixer!  My older one is starting to die, which is sad.  My parents gave it to me for a wedding shower gift, almost 10 years ago.


Emily’s Favorite Sugar Cookies
1 cup unsalted  butter, creamed
2 cups of white sugar
3 eggs
1 ½ teaspoons cream of tartar
5 cups of flour
2 tablespoons of milk
1 ½ teaspoon of baking soda
1 teaspoon of salt
1 teaspoon of vanilla

Preheat oven at 350 degrees.  Let butter sit out until it reaches room temperature.  Cream butter in mixer using paddle attachment.  Add sugar and continue to blend together until well combined.  Add eggs and combine together.  Sift 5 cups of flour together with the cream of tartar and salt.  Make sure that the flour, salt and cream of tartar are well combined.  Slowly add flour to egg, sugar and butter mixture.  In a small dish, combine the milk, baking soda and vanilla.  Mix together until baking soda dissolves.  Add to cookie dough until well incorporated throughout dough.

Remove dough from bowl and place on plastic wrap.  Form a disc shape and wrap.  Place dough in fridge for 30 minutes to chill. 

Remove dough from fridge and let it warm up for 10-15 minutes.  Cut disc into quarters.   Use however many quarters of dough you think you need.  I usually use one quarter of the dough and freeze the rest for another time.  I find that one quarter of the dough usually makes around 12-18 cookies, depending on cookie cutter shape and size. 

Place dough on a floured board and flour rolling pin, as well.  Roll out dough until about ¼ inch thick.  Using a floured cookie cutter cut out shapes and place them on a parchment lined baking sheet. 
Bake cookies at 350 degrees for 6 minutes.  The edges will turn a golden brown. 

Mixing the dough in my new KitchenAid Mixer.  I purchased the professional and it makes mixing so much easier. 

Mix together the milk, baking soda and vanilla extract.  Once combined and the baking soda dissolved, it then can be added to the cookie dough mixture.

I like to flour a wood cutting board and roll the dough out on that.  Make sure it is well floured, as well as the rolling pin.  I also like to dip my cookie cutter into a bit of flour as well.

Place cut outs on a baking sheet lined with parchment paper.  This will prevent sticking and also make clean up a breeze. 

All puffed up with golden edges.  Let the cookie cool completely before decorating.

I like to set up my decorating "station" while the cookies cool.  I clean up all from mixing and baking and give myself a clean counter area for decorating.  Here I have my homemade royal icing and some white ball sprinkles.


Outline the ghost with icing. 

Add icing inside the outline.  Smooth it with a knife or cake decorating spatula.
 Add sprinkles while frosting is still wet.


 These cookies are simple and make a great treat.  If you have to make a baked good for your child's classroom Halloween party, these cookies would be ideal.  I will be sure to share my royal icing recipe soon. 
Since holiday baking is almost here, now is a good time to check grocery store fliers for sales on different ingredients such as flour, sugar, baking soda, brown sugar and chocolate chips.  Keep your eye for sales and stock your pantry.  Fresh ingredients will ensure delicious cookies and whatever else you bake!


Sunday, October 19, 2014

Sunday Broccoli Soup

It is snowing at my house.  Snow.  Falling from the sky.  My kids are screaming with delight and I am loving it!  I know this snow is temporary because the weather forecast for next week is in the 60s, but I am really enjoying this little preview.

With the shift of weather not far away, I thought today would be a perfect day to share my delicious broccoli and cheddar soup.  This recipe was developed after the first time I tried the broccoli cheddar soup from Panera Bread, many years ago.  Over the years, my recipe has been tweeked into the recipe I about to share. 

This soup is a great addition to a cold fall or winter day.  It is hearty and warms you up.  A big bowl after splitting firewood in the cold fall wind or sledding in the snow would be perfect!


Broccoli & Cheddar Soup
3 tablespoons of butter
1 medium onion, diced
½ cup flour
4 cups half and half, or heavy whipping cream
4 cups of chicken stock
1 pound broccoli (fresh or frozen)
Salt and pepper to taste
½ teaspoon nutmeg
16 ounces of sharp cheddar cheese
Melt three tablespoons of butter in a big pot.  Add onions and saute until the onions are translucent.  Add flour to melted butter and onion mixture.  Stir for 3-5 minutes.  Stirring constantly, slowly add the half and half.  Add the chicken stock and continue to constantly stir.  Simmer for 20 minutes.  The soup will start to thicken.
Add the broccoli and cook over low heat until the broccoli is tender, around 20-25 minutes.  Add salt and pepper.  By now, the soup should be thick.  Using an immersion blender, blend and puree the soup to desired texture.  Keep the soup over low heat and add the cheddar cheese.  Stir until blended, add nutmeg and serve. 
 The butter melting in the pot.

 Onions cooking until they are translucent.
 The flour added to melted butter and onions.
 Half and half added, the soup is thickening.
 Broccoli added and simmering, the soup will continue to thicken.
 Combine and blend with an immersion blender.
 Add cheddar cheese and combine.

Thursday, April 3, 2014

Daffodils and Burlap

When the calendar changed to April 1st, it was time for me to start decorating for Easter and spring.  I went to the grocery story and in the flower section was a display of fresh cut daffodils and also potted daffodils.  Daffodils are one of my favorite flowers.  I love the bright yellow color and the fresh scent.  The yellow instantly makes me feel happy and puts me in a good mood.  Nothing says spring more than a daffodil!


I bought some of the beautiful flowers from the grocery store and planned on using them in the dining room.   


For the dining room table I decided to keep it very natural and simple.  Two summers ago I hosted a bridal shower for my cousin.  My mom and I made a burlap table runner.  I decided to pair that with my daffodils.  Last summer my dad made me a box out of a an old pallet.  I knew that the daffodils would fit perfectly inside and would look very natural on the table runner.


What I really enjoyed about this centerpiece was the ease and simplicity of putting it together
 I already had the table runner and box.  All I added was fresh flowers from the local grocery store.


What is your favorite spring flower?

Tuesday, April 1, 2014

Mad Men Style Bar Cart


I have to confess...I absolutely love the show Mad Men on AMC.  The new season starts Sunday, April 13th and I am very excited to see what is going to happen to my favorite characters.  Thanks to Mad Men, I found the inspiration for my latest décor project and entertainment piece.

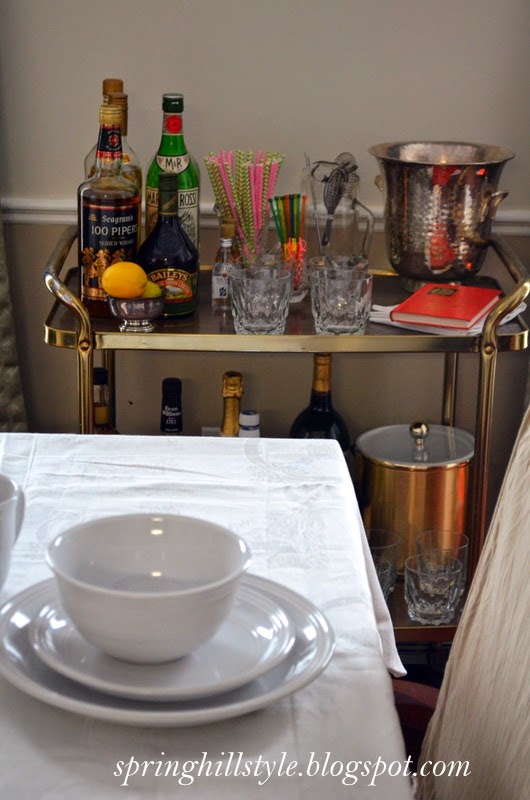
This past summer I remodeled our dining room.  When the room was completed it looked great, but was still lacking something.  It needed a little pizazz, even after the new paint colors, lights and all my hard work.  After months of looking around, I still could not find anything that I liked and I was starting to become discouraged.  Finally, in January, I happened upon a wheeled brass cart.  This cart was headed to the dumpster and I rescued it immediately.  Upon first glance, I knew exactly what I was going to do with this newly found treasure and where it would call home in my house.  Thanks to my love for Mad Men and this great find, the dining room bar cart was born.
I decided to stock the bar cart with materials and accessories that were best fitted to me and my entertaining needs.  I do not pretend to be a professional bartender or know anything about how to make fancy drinks.  I tend to stick to the basics and not get too fancy.

Normally, I am a person that has to have everything coordinate and match, but as I was putting together the bar cart, I went in the complete opposite direction.  I have a brass cart, silver bar tools, glass cocktail glasses and pitcher, along with silver and gold ice buckets.  Nothing matches and that is what I like about the display.  I think it came together and looks stunning.  For added decoration and functionality, I included the different colored chevron straws (purchased from Hobby Lobby).  I think they add a playful feel to the cart, along with the different (and vintage!) stir sticks and bottles.  I also have a white bar towel to clean up any messes, as well as a vintage drink recipe book.  I think it adds extra charm.  On the bottom shelf, I also included nonalcoholic beverages and sodas for making mixed drinks.


The wheels on the cart are an extra bonus.  It is easy to roll and can be wheeled to any room.  I am thinking that when summer time “rolls” around, I will bring the cart to the back deck when entertaining.  What is truly great is that the cart can be styled to fit any type of party or entertaining style.  The versatility is endless.

Here is a very basic list of things I came up with to stock my bar cart.  You may find this list helpful if you are setting up a bar cart, bar shelf or getting ready to host a party. 
·         Glasses
·         Ice bucket
·         Towel
·         Bar Tools: shaker, bottle opener, shot glass, tongs, stir sticks, knife, wine opener
·         Garnish: lemons, limes, cherries, olives
·         Gin
·         Whiskey
·         Rum
·         Scotch
·         Vodka
·         Wine
·         Bailey’s
·         Other Beverages: Tonic Water, Sodas (Ginger Ale, Coca-Cola), Orange and/or Cranberry Juice

I love how the cart looks in the dining room when it is not being used.  I think it brings a vintage  feel to an otherwise very classic and traditional room.   
 
Have any of your favorite television shows inspired your decorating or entertaining style?